Exit Deck | Component 4: Producing & Analysing (9MT0/04)
Paper 9MT0/04 Overview

Component 4: Producing & Analysing Architecture

The Pearson Edexcel Component 4 exam is a 2-hour 15-minute practical and written paper carrying 105 marks (40% of the A-Level). Candidates complete practical audio tasks in their DAW alongside critical written analysis.

Official Exam Walkthrough Component 4 Exam Protocol & Time Management
YouTube β†—
How to Score FULL MARKS in Component 4 – Fix This NOW! πŸ”₯
Music Tech Guru Masterclass
🎧 Exam Room Setup & Ear-Training Protocol
  • Calibrate closed-back monitor headphones before starting; verify uncompressed 24-bit/44.1kHz audio stems import without automatic tempo stretching.
  • Split the 2h 15m session strictly: 45m for Q1–Q4 practical editing/correction, 45m for Q5 balance & mixdown, and 45m for Q6 extended technical essay.
105 Marks40% Qualification2h 15m DurationLogic Pro / DAWSection A + BUncompressed Audio
DAW Architecture & Workflow Digital Audio Workstation Signal Engine
DAW Interface Signal Engine
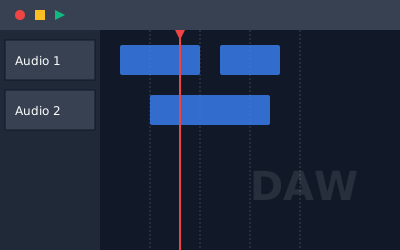
πŸ–₯️ The Component 4 Digital Studio Workspace
24-bit / 44.1kHz Audio Engine • Non-Destructive Editing • 64-bit Float Mix Bus

Exam Paper Structure & Mark Allocations

Section A (85 marks) tests practical DAW tasks: editing, timing alignment, pitch correction, sample replacement, subtractive synthesis sound design, dynamic processing, and surgical EQ unmasking, culminating in Question 5 (final track balance and bounce).

Section B (20 marks) is Question 6: an extended written evaluation analyzing contrasting recording scenarios, acoustic room behaviors, hardware circuitry, or digital signal paths under strict Pearson AO3/AO4 criteria.

Examiner Traps & Golden Rules
1
Zero-Crossings: Always slice audio files at true zero-crossings to avoid audible DC clicks and digital pops.
2
Crossfade Safety: Apply 5–10ms equal-power crossfades on all audio edits to prevent phase discontinuity.
3
Gain Staging: Keep individual channel faders below 0 dBFS; aim for -18 dBFS RMS to preserve headroom on the mix bus.
Section A • Practical DAW Tasks

Audio Editing: Finding Mistakes & Copying Audio

Audio editing in Component 4 tests practical track repair: listening to stems to locate performance mistakes or unwanted noises, and cleanly copying good audio to fix them.

DAW Practical Demonstration Question 1 Audio Editing & Stem Correction
YouTube β†—
A-Level Music Tech: Audio Editing & Track Correction for Component 4
Music Tech Guru Tutorial
🎧 Ear-Training Focus: Spotting Faults & Clean Splices
  • Solo the track and listen for faults: wrong notes, timing slips, bad vocal takes, or unwanted sounds like clicks, pops, count-in bleed, and mic thumps.
  • Audition your edit points in solo and in the full mix: make sure the copied section lands on beat with no timing drift, and check for clicks at region boundaries.
Find MistakesCopy & PasteClean TakeZero-Crossing5–10ms CrossfadeTrim Silence
DAW Audio Editing Workflow Spotting Mistakes & Copying Clean Audio
Finding Mistakes and Copying Audio in DAW
βœ‚οΈ Non-Destructive DAW Editing: Spot, Copy & Replace
Identify Fault • Locate Clean Section • Snap to Grid • 5–10ms Crossfade

The Two Golden Rules of Exam Audio Editing

Rule 1: Always find the mistake first. Component 4 stems feature deliberate errorsβ€”such as a guitarist playing a wrong chord in Verse 2, a missed vocal lyric, or a click track bleed. Pinpoint the exact bar and beat.

Rule 2: Copy from an identical clean bar earlier in the track (e.g. Verse 1). Paste it into place on the beat grid, and always apply a 5–10ms equal-power crossfade across the edit to prevent digital clicks or pops.

3 Steps to Full Marks in Editing Tasks
1
Identify the Mistake: Solo the track and listen with headphones. Mark the start and end of the faulty section or unwanted noise.
2
Copy Clean Audio: Find the matching bar from another chorus or verse that was performed correctly, cut it cleanly, and copy it.
3
Paste & Crossfade: Snap the copied audio to the exact bar/beat, verify groove sync, and add 5–10ms crossfades at both boundaries.
Section A • Dynamic Processing

Dynamic Control: Compression, Gating & Sidechaining

Component 4 tests precise configuration of compressor parameters to control dynamic range, shape transient attack punch, clamp peak overshoots, and clean bleed with noise gates.

Logic Pro Masterclass Parallel Compression in Logic Pro – A-Level Music Tech
YouTube β†—
Parallel Compression in Logic Pro – A-Level Music Tech Tutorial
Music Tech Guru Tutorial
🎧 Ear-Training Focus: Attack & Release Calibration
  • Fast attack (<1ms) crushes drum transients, pushing the snare backward in the mix; slower attack (15–30ms) lets initial stick-crack poke through before clamping body.
  • Parallel (New York) compression blends heavily smashed transient punch with natural uncompressed dynamics, delivering massive fatness without sacrificing life.
ThresholdRatioAttack / ReleaseSidechain DuckingNoise GateVCA / FET / Opto
Compressor Anatomy & Transfer Curve Input vs Output dB Transfer Function
Compressor Transfer Curve Diagram
🎚️ Dynamic Processing Parameters & Circuit Topologies
VCA (Clean/Precise) • FET 1176 (Ultra-Fast 20Β΅s) • Opto LA-2A (Program-Dependent) • Vari-Mu (Tube Bias)

Sidechain Ducking & Frequency-Conscious Gating

Sidechain compression routes an external key signal (e.g., Kick Drum) into the compressor's detector circuit to duck another track (e.g., 808 Sub Bass or Synth Pad), clearing low-end headroom and creating rhythmic groove.

Frequency-dependent gating uses high-pass/low-pass sidechain filters so the snare gate only triggers on mid-frequency snare hits (2–4kHz) and ignores high-frequency hi-hat bleed.

The 4 Core Compressor Controls
1
Threshold (dB): Sets the decibel amplitude level above which gain reduction is triggered.
2
Ratio (X:1): Determines the proportion of input attenuation applied to signal exceeding threshold.
3
Make-up Gain: Compensates for peak attenuation, raising the average RMS energy of the signal.
Section A • Frequency Balance

Surgical EQ: Frequency Carving & Unmasking

Equalisation in Component 4 is fundamentally corrective: removing unwanted low-frequency rumble, carving overlapping clutter between competing instruments, and controlling resonant peaks.

Logic Pro Tutorial Channel EQ in Logic Pro X – Essential Tips for Beginners
YouTube β†—
Channel EQ in Logic Pro X – Essential Tips for Beginners!
Music Tech Guru Masterclass
🎧 Ear-Training Focus: Spotting Frequency Masking
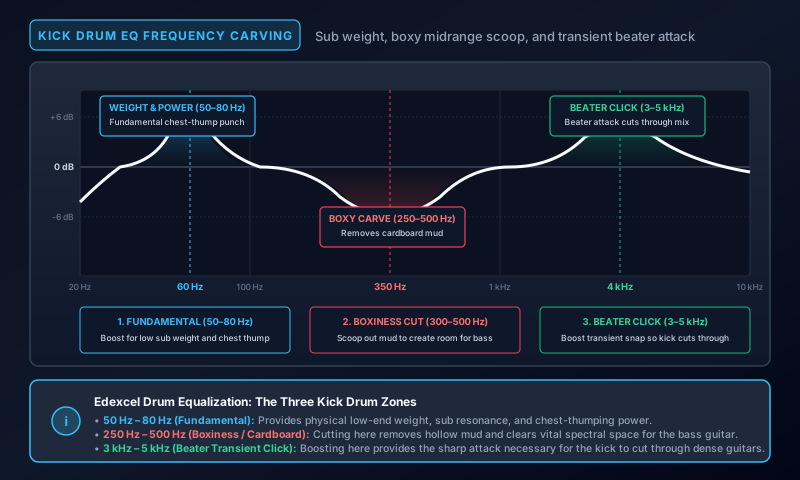
  • When kick drum (60Hz fundamental) and bass guitar (90Hz fundamental) compete for the same energy, subtractive EQ carving separates them so both remain articulate.
  • Boxiness sits between 300Hz and 500Hz; nasal harshness between 1kHz and 3kHz; sibilance and harsh cymbals between 6kHz and 9kHz.
High-Pass 24dB/octQ-FactorSubtractive CarvingUnmaskingLinear PhaseBoxiness 300Hz
Kick & Bass Frequency Carving Complementary Subtractive EQ Sculpting
Kick and Bass Complementary EQ Diagram
πŸ“Š Complementary Subtractive Frequency Sculpting
Kick fundamental at 60Hz • Bass notched at 60Hz / boosted at 90Hz • Cleared 300Hz Mud

High-Pass Filter Slopes & Q Factor Bandwidth

High-pass filters (HPF) clean non-musical sub-rumble below 30Hz on kick/bass and below 100Hz on guitars and vocals. Filter slopes range from gentle 6dB/octave (1st-order) to steep 24dB/octave (4th-order).

Quality factor $Q = f_0 / \text{Bandwidth}$. High Q values (>5) create narrow surgical notches to remove unwanted room resonances or mains hum without altering surrounding timbre.

Linear Phase vs. Minimum Phase in Exam Practice
1
Minimum Phase: Standard analogue-modeled EQ; zero latency and warm phase shift, but alters phase around cutoffs.
2
Linear Phase: Preserves exact waveform time alignment; zero phase smearing, ideal for multi-mic drum overheads.
3
Subtractive Rule: Always cut narrow with high Q to fix faults; boost wide with low Q (<1.0) for musical tone.
Section A • Spatial Positioning

Spatial Positioning: Stereo Panning (L/R) & Reverb Depth

Creating a balanced 3D mix in Component 4 relies on two fundamental tools: positioning instruments across the stereo field using Left and Right panning, and creating front-to-back depth with Reverb.

Mixdown Masterclass Spatial Positioning & Mix Placement
YouTube β†—
How to Get Top Marks in A-Level Music Tech Mixing (Component 1 & 4)
Music Tech Guru Masterclass
🎧 Ear-Training Focus: Stereo Soundstage & Front-to-Back Depth
  • Listen across the stereo field: ensure the center isn't cluttered. Spread rhythm guitars, keyboards, and backing vocals Left and Right to make space for the lead vocal.
  • Assess front-to-back depth: keep the lead vocal and bass dry and upfront. Use subtle reverb on rhythm parts to push them naturally into the room behind the focal elements.
Stereo PanningLeft & RightCenter AnchorReverb DepthDry vs WetMono Compatibility
DAW Spatial Architecture Left/Right Panning & Reverb Depth
Spatial Positioning with Left Right Panning and Reverb Depth
πŸŽ›οΈ The 3D Mix Soundstage: Width (L/R) & Depth (Reverb)
Pan Pots (Left/Right) • Center Anchor • Dry vs. Wet Depth • Aux Reverb Bus

Building a Clear, 3-Dimensional Soundstage

In Component 4 mixing, examiners listen for clarity, instrument separation, and a sense of physical space. Panning allows you to separate competing instrumentsβ€”like double-tracked electric guitars panned hard Left and Rightβ€”so they don't fight with the center.

Depth is created using reverb. A completely dry sound sits directly in front of the listener's face (intimate and upfront), while adding reverb moves the instrument further back into the virtual room. Always keep low frequencies (kick and bass) dry to preserve punch.

The 3 Golden Rules of Spatial Placement
1
Anchor the Center: Keep Kick drum, Snare, Bass guitar, and Lead vocal panned dead center (0) for maximum punch, focus, and mono compatibility.
2
Pan Left & Right: Pan rhythm guitars, synth pads, hi-hats, and backing vocals across the stereo field to create width and avoid masking the lead vocal.
3
Create Depth with Reverb: Use dry levels to bring lead vocals and drums up front, while using an Aux reverb send to push rhythm and ambient elements back into the room.
Section A • Time-Based Effects

Time-Based FX: Reverb Pre-Delay, RT60 & Aux Busses

Auxiliary send/return topology is mandatory for spatial effects in Component 4: inserting reverb directly onto audio tracks wastes CPU, causes phase mud, and prevents shared acoustic space.

Logic Pro Tutorial How to Use Reverb (Basic to Pro) on Logic Pro X
YouTube β†—
How to use reverb (basic) on Logic Pro X
Music Tech Guru Tutorial
🎧 Ear-Training Focus: Pre-Delay Separation & Reverb EQ
  • Setting 20–40ms pre-delay on vocal reverb leaves the initial dry consonant attack completely articulate before the ambient reverb wash envelops the note.
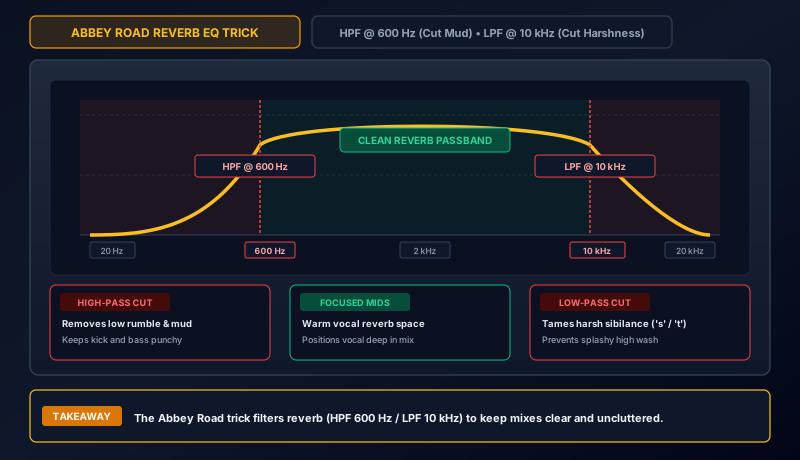
  • Abbey Road Reverb Trick: High-pass reverb sends at 600Hz and low-pass at 6kHz to prevent low-end bass rumble and harsh high-frequency splash.
Aux Send/ReturnPre-Delay GapRT60 DecayAbbey Road TrickConvolution IRTempo-Synced Delay
Abbey Road Reverb EQ Filter High-Pass 600Hz & Low-Pass 6kHz Aux Filtering
Abbey Road Reverb Filtering Diagram
πŸ›οΈ Reverb Architecture: Algorithmic vs. Convolution
Impulse Response (IR) Sampling • RT60 Decay Spectrum • Early Reflections • Late Reverb Tail

Parallel Aux Send vs. Serial Insert Routing

Time-based effects (reverb, delay) are placed on dedicated Auxiliary Return tracks set to 100% Wet. Individual track channel faders use variable Aux Sends to feed proportional dry signal into the shared virtual room.

Modulation effects (chorus, phaser, flanger) are placed as Serial Inserts directly on channel strips, blending dry and wet inside the plugin using internal Mix % controls.

Key Parameter Formulas for the Exam
1
Quarter-Note Delay: Delay time $(ms) = 60,000 / \text{BPM}$. (e.g. at 120 BPM, quarter-note = 500ms).
2
Dotted-Eighth Delay: Multiply quarter-note delay by $0.75$ (e.g., $500ms \times 0.75 = 375ms$).
3
Pre-Delay Calculation: Keep pre-delay under 50ms; longer offsets are heard as distinct slapback echoes rather than spatial depth.
Section A • Sound Design

Synthesis & Sampling: Subtractive Signal Flow

Component 4 tests the candidate's ability to recreate reference synthesizer timbres from scratch using subtractive synthesis, envelope modulation, and sampler keyzone mapping.

Synthesis Masterclass How to Use the Retro Synth in Logic Pro X
YouTube β†—
How to use the RETRO SYNTH in Logic Pro X. Simple Music Production tutorial
Music Tech Guru Masterclass
🎧 Ear-Training Focus: Waveform & Envelope Auditioning
  • Sawtooth waves contain all integer harmonics ($1f, 2f, 3f...$), sounding bright and reedy; Square waves contain only odd harmonics ($1f, 3f, 5f...$), sounding hollow and clarinety.
  • Fast Attack, Fast Decay, Zero Sustain, and Moderate Release creates a plucky percussive bass; Slow Attack (>500ms) with Max Sustain creates lush ambient pads.
Subtractive FlowOscillators (VCO)VCF Cutoff / ResVCA EnvelopeADSR ModulationSampler Keyzones
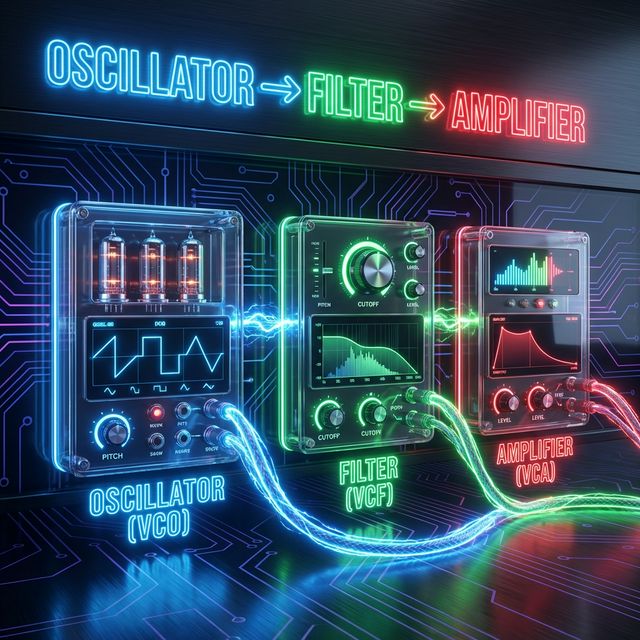
Subtractive Synth Signal Flow Oscillator -> Filter -> Amplifier Architecture
Subtractive Synthesizer Signal Flow Schematic
🎹 Classic Subtractive Synthesis Architecture
VCO / Waveforms • 24dB/oct Ladder Filter • Resonance ($Q$) • Dual ADSR Envelopes • LFO Mod Matrix

Filter Cutoff Modulation & Key Tracking

The filter envelope generator modulates cutoff frequency dynamically over time. Filter resonance ($Q$) boosts harmonics near the cutoff point, producing signature resonant squelches or self-oscillation.

Key tracking (Keyboard Follow) opens the filter cutoff as higher MIDI notes are played, maintaining consistent brightness and harmonic proportions across the entire 88-key range.

Sampler Mapping Fundamentals
1
Root Key & Keyzones: Assign raw audio samples to exact MIDI root notes; map keyzone boundaries to prevent unnatural chipmunk pitching.
2
Velocity Crossfading: Layer multiple dynamic velocity layers (soft, medium, hard) to capture authentic acoustic timbre variations.
3
Loop Points & Crossfading: Set zero-crossing loop points with equal-power crossfades on sustained pads to prevent clicks.
Section A • Audio Troubleshooting

Diagnostic Fault Finding: Hum, Clipping & Phase

Component 4 frequently introduces audio stems containing intentional audio faults. Candidates must identify the physical origin of the artifact and apply appropriate surgical corrective processing.

Exam Walkthrough Video 2019 Production & Analysing Exam Guidance (Question 1)
YouTube β†—
Edexcel A Level Music Technology - Component 4 Exam 2019 Guidance Video (Question 1)
Music Tech Guru Official Exam Guide
🎧 Ear-Training Focus: Recognizing Common Audio Artifacts
  • Mains Hum: A steady 50Hz (UK) or 60Hz (US) low buzz with prominent harmonic overtones at 100Hz, 150Hz, 200Hz, caused by ground loops or unshielded guitar single-coils.
  • Digital Intersample Clipping: Harsh, brittle square-wave distortion generated when audio exceeds 0 dBFS, producing unharmonic aliasing across high frequencies.
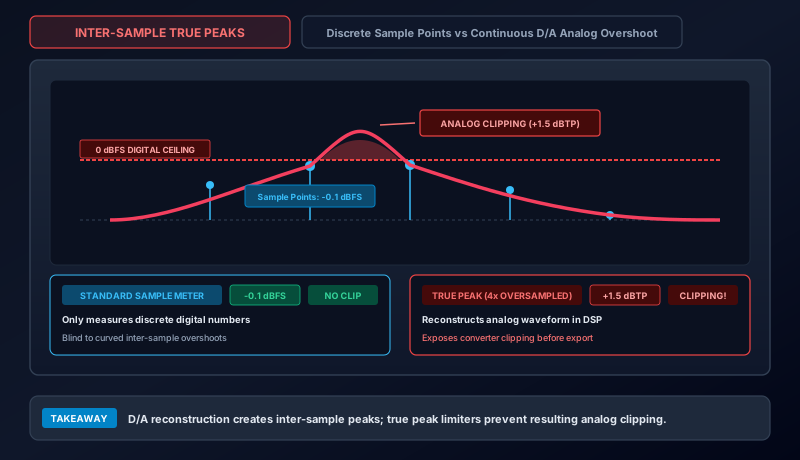
50Hz Mains HumDigital ClippingDC OffsetVocal SibilanceHeadphone BleedSpectral Repair
Inter-Sample True Peak Overshoots Digital Overs vs Reconstruction Filter Reconstruction
Inter-sample True Peak Clipping Diagram
πŸ” Common Component 4 Audio Faults & Corrective Solutions
Ground Loops (50Hz) • Digital Overs (>0 dBFS) • DC Offset • Sibilance (5–8kHz) • Mic Spill

DC Offset & Sibilance Management

DC offset occurs when direct current biases the alternating audio waveform away from the zero-amplitude center line, reducing dynamic headroom and causing loud clicks at edit boundaries. Fix: Apply a high-pass filter at 20Hz.

De-essing is frequency-specific split-band dynamic attenuation. When sibilant 'S' and 'T' sounds peak between 5kHz and 8kHz, the compressor ducks only that frequency band while leaving mid-range vocals untouched.

Examiner Checklist for Audio Cleanup
1
Mains Hum Removal: Use narrow notch filters ($Q > 15$) at 50Hz, 100Hz, and 150Hz rather than a wide high-pass cut.
2
Headphone Bleed: Use an automated downward expander or noise gate with gentle release to silence click spill during vocal pauses.
3
Phase Cancellation: Check stereo stems in mono; if low frequencies vanish, flip polarity or apply manual sample delay nudging.
Section A • Final Delivery

Mixdown & Mastering: Gain Staging, Automation & LUFS

Question 5 requires producing a balanced stereo mixdown with appropriate dynamic control, spatial balance, volume automation, and export formatting matching industry loudness standards.

Logic Pro Masterclass Basic Mastering on Logic Pro X – Walkthrough and Tips
YouTube β†—
Basic Mastering on Logic Pro X. Walkthrough and tips
Music Tech Guru Tutorial
🎧 Ear-Training Focus: Master Bus Glue & Loudness
  • Mix bus glue compression uses gentle 1.5:1 or 2:1 ratios with slow attack (30ms) and auto release: needles should tickle only 1–2dB of gain reduction to knit elements together.
  • Do not over-limit: crushing dynamics down to -8 LUFS destroys punch and transient clarity. Maintain healthy dynamic crest factor for streaming platforms.
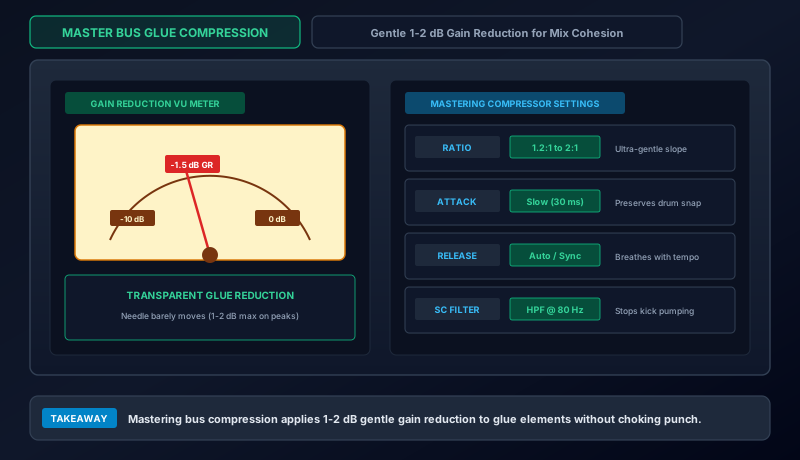
-18 dBFS HeadroomMix Bus GlueAutomation ModesTrue Peak Limiter-14 LUFS StandardsTPDF Dither
Mix Bus Compression & Streaming Loudness True Peak Ceiling & Integrated LUFS Metering
Master Bus Compression and Loudness Diagram
πŸ“ˆ Professional Mixdown Standards & Delivery Protocols
-18 dBFS Nominal • VCA Groups • -1.0 dBTP Ceiling • -14 LUFS Integrated • 24-bit to 16-bit TPDF Dither

Automation Modes in the Exam

Read: Plays back existing automation without recording changes. Touch: Writes automation only while touching the control; snaps back to previous values on release. Latch: Begins writing on touch, keeps current value after release until playback stops. Write: Continuously overwrites all existing data.

Mastering Delivery: Inter-sample peaks occur during digital-to-analogue conversion (DAC). Set true peak limiters to -1.0 dBTP ceiling to avoid clipping on streaming encoders (MP3, AAC).

Mastering Export Protocols
1
Target Loudness: Aim for -14 LUFS integrated for streaming normalization, with short-term peaks staying below -11 LUFS.
2
True Peak Ceiling: Always set master output limiter ceiling to -1.0 dBTP (or -0.5 dBTP minimum).
3
Dithering Protocol: When bouncing 24-bit DAW projects to 16-bit master files, apply Triangular Probability Density Function (TPDF) dither.
Section B • Extended Essay (20 Marks)

Extended Response: AO3 vs. AO4 Essay Strategy

Question 6 is a 20-mark essay comparing two studio approaches. To get top marks, balance technical facts (AO3) with how they affect the sound (AO4).

Exam Essay Masterclass How to Ace the 2022 Edexcel Music Tech Component 4 Exam!
YouTube β†—
How to Ace the 2022 Edexcel Music Tech Component 4 Exam!
Music Tech Guru Tutorial
πŸ“ Simple 4-Step Essay Structure
  • ΒΆ1 & ΒΆ2: State the scenario goal, then detail Approach A (gear, mic placement, DAW settings) and explain its sonic character.
  • ΒΆ3 & ΒΆ4: Detail Approach B, compare pros and cons directly against Approach A, and conclude with the best choice for the scenario.
20 MarksAO3: Tech (10m)AO4: Sound (10m)Compare BothJustify ChoiceSimple 4-Step Plan
Pearson Edexcel Mark Scheme Matrix AO3 (Technical Facts) vs AO4 (Sonic Evaluation)
AO3: Technical Facts 10 MARKS
WHAT gear & HOW it works
  • Name specific microphones & polar patterns
  • State mic distance, angle & placement
  • Detail signal routing, EQ & compression controls
AO4: Aural Evaluation 10 MARKS
WHY you chose it & HOW it sounds
  • Describe sonic results (warmth, bleed, punch, room)
  • Compare the trade-offs of both options
  • Explain which method best suits the scenario
🎯 How Examiners Award the 20 Marks
Mark Band AO3: Technical Facts (10m) AO4: Sonic Evaluation (10m)
Band 4
(17–20)
Accurate gear names, signal chain & precise settings. Directly compares both options; explains sonic trade-offs.
Band 3
(13–16)
Good tech knowledge with mostly correct controls. Clear reasons for choices; explains impact on the mix.
Band 2
(7–12)
Basic gear descriptions; occasional technical errors. Describes what was used, but rarely explains why.
Band 1
(1–6)
Vague or incorrect claims; confuses basic concepts. Just lists equipment with no evaluation or link to scenario.
1 / 10